Well, i was pissed off cos RS cocked up my order, wont be finishing phono till next week now.
So, itching to do something productive (and cheap) with my time off i decided to start the WD25TL project.
http://homepage.mac.com/tlinespeakers/F ... ted-WD.pdf
Ive got some chipboard and some stuffing, will make a start today.
Ill post some pics when it starts to look interesting.
WD25TL
-
pre65

- Amstrad Tower of Power
- Posts: 21400
- Joined: Wed Aug 22, 2007 11:13 pm
- Location: North Essex/Suffolk border.
#3
Well,if you build a handed pair,you can have them either way !
Think about it.
As far as i am aware the tweeter is normally to the inside.
Think about it.
As far as i am aware the tweeter is normally to the inside.
The only thing necessary for the triumph of evil is for good men to do nothing.
Edmund Burke
G-Popz THE easy listening connoisseur. (Philip)
Edmund Burke
G-Popz THE easy listening connoisseur. (Philip)
#5
Nearly there.
well, here we go. Rough and ready
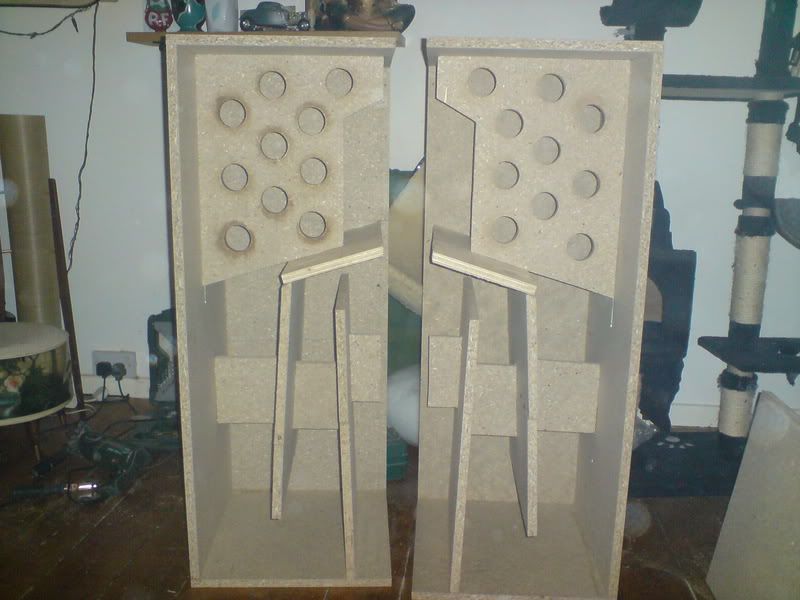
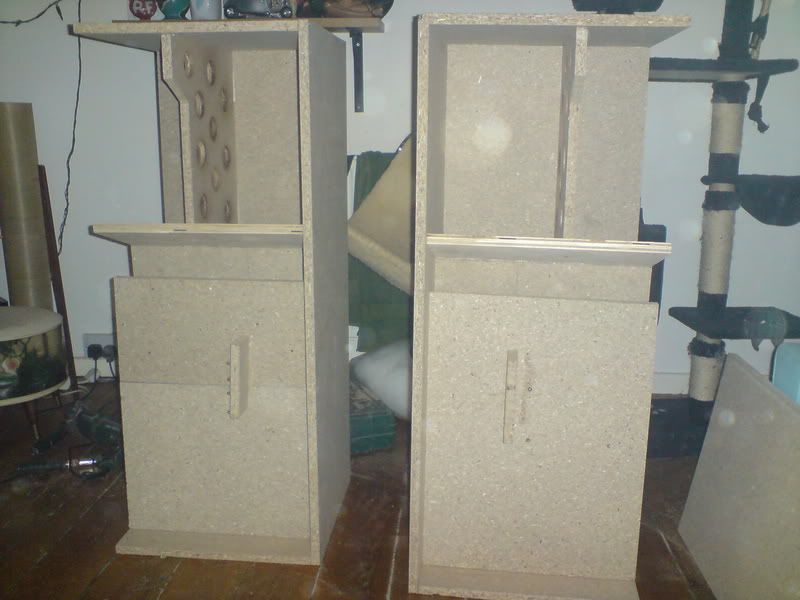
Had to bodge a couple of the internal pieces. Ill seal all the internal corners later.
Just need to cut the baffles then screw the sides on.
Sides will be removable for now so i can play with stuffing.
Not a bad days work, flats a mess though!!
well, here we go. Rough and ready
Had to bodge a couple of the internal pieces. Ill seal all the internal corners later.
Just need to cut the baffles then screw the sides on.
Sides will be removable for now so i can play with stuffing.
Not a bad days work, flats a mess though!!
#6
Nearly there.
well, here we go. Rough and ready
Had to bodge a couple of the internal pieces. Ill seal all the internal corners later.
Just need to cut the baffles then screw the sides on.
Sides will be removable for now so i can play with stuffing.
Not a bad days work, flats a mess though!!
well, here we go. Rough and ready
Had to bodge a couple of the internal pieces. Ill seal all the internal corners later.
Just need to cut the baffles then screw the sides on.
Sides will be removable for now so i can play with stuffing.
Not a bad days work, flats a mess though!!

#10
So how much should i be stuffing these then?
I put a load in, looser in the chamber, looks like this
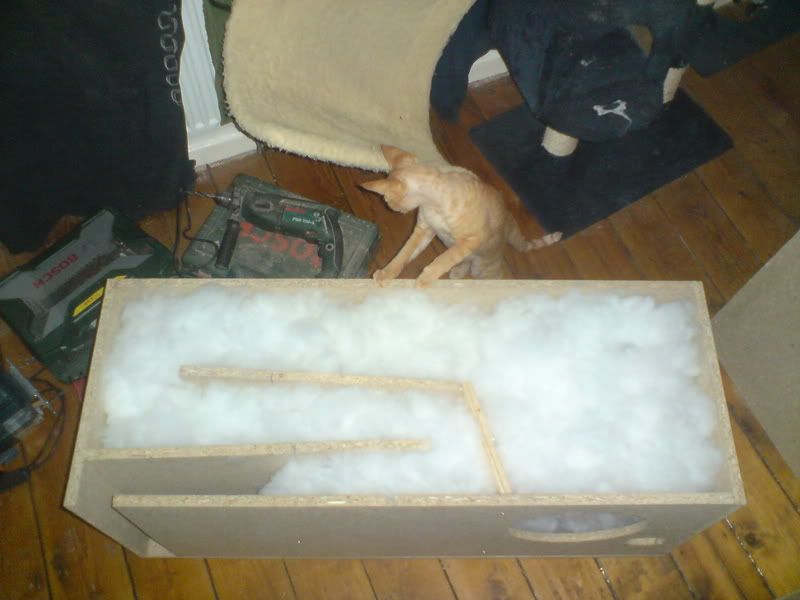
Does that look about right?
I bought a big 1 kilo bag, theres probably about 750g in there.
Ive no idea how much i should be using.
Also, how do i stop this getting in the drivers?
I put a load in, looser in the chamber, looks like this
Does that look about right?
I bought a big 1 kilo bag, theres probably about 750g in there.
Ive no idea how much i should be using.
Also, how do i stop this getting in the drivers?
-
Scottmoose

- Needs to get out more
- Posts: 1802
- Joined: Sat Sep 08, 2007 11:03 am
- Contact:
#13
Well, you have the densities needed: 0.2 lbs ft^3 in the upper chamber, 0.5lbs ft^3 in the rest of the line.
So, what you need to do is calculate the volume of the chamber in cubic feet & multiply by 0.2 for the quantity needed (not much) in lbs. Then calculate the volume of the line, and multiply by 0.5 for the quantity needed in lbs. Finally, weigh out the material on a set of scales not at all stolen from the kitchen, and tease out to a uniform density which you add throughout the appropriate section (chamber or line). Job done.
So, what you need to do is calculate the volume of the chamber in cubic feet & multiply by 0.2 for the quantity needed (not much) in lbs. Then calculate the volume of the line, and multiply by 0.5 for the quantity needed in lbs. Finally, weigh out the material on a set of scales not at all stolen from the kitchen, and tease out to a uniform density which you add throughout the appropriate section (chamber or line). Job done.
'"That'll do," comes the cry of the perfectionist down the ages.' (James May The Reassembler)
Website www.wodendesign.com
Community sites www.frugal-horn.com & www.frugal-phile.com
Website www.wodendesign.com
Community sites www.frugal-horn.com & www.frugal-phile.com